Warning: Undefined array key "HTTP_ACCEPT_LANGUAGE" in /var/www/minitokyo/www/includes/common.inc.php on line 360 Dream's Guide to Scanning in Photoshop. - Minitokyo

Dream's Guide to Scanning in Photoshop.

page 1 of 1 6 total items

DREAM

DREAM

Lord of Dreams

i thought it would be nice to devise a step by step instruction on creating high resolution, raw scans that can be used to create glorious wallpapers.

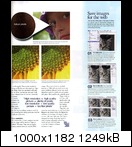
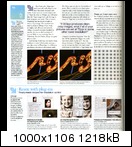
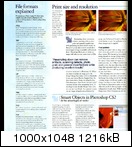
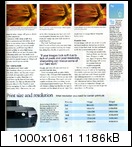
as a background reference on "resolutions" i have scanned an article by the imaging wizards at Photoshop Creative, that i have found most informative:
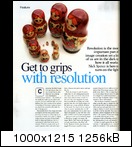
http://www.abload.de/thumb/basics1.jpgy3f7.jpeg http://www.abload.de/thumb/basics2.jpgl51b.jpeg http://www.abload.de/thumb/basics3f6hi.jpg http://www.abload.de/thumb/basics4.jpgw3hu.jpeg http://www.abload.de/thumb/basics5.jpge412.jpeg http://www.abload.de/thumb/basics6w1tl.jpg

to scan one needs access to:
electricity
a computer
digital imaging software [PS or PSP]
a scanner [be sure to clean the glass]
an art-book [make sure book is clean not dusty, bloody, muddy etc]

i will be using Photoshop software.
before scanning: make sure to set up PS or PSP to directly IMPORT scans. never use the scanning software to edit/scan provided with the scanner, since PS is so much better at editing large scans and the image will be directly imported into Photoshop.

now we can begin:
1) Open up Photoshop. We are ready to start scanning. go to FILE - IMPORT - THEN SELECT YOUR SCANNER. I choose Epson Perfection 2580.

http://premium1.uploadit.org/LordDream//step1a.jpg
Larger Image

2) Always scan at the highest resolution you can. Never scan lower than 300 resolution. In this case I am scanning at 600 ppi. Hit PREVIEW and then SCAN.

http://premium1.uploadit.org/LordDream//step2a.jpg
Larger Image

3) After scanning your images- hit CLOSE. You are now back in Photoshop. Hit C to crop. Select the area you want to keep and then RIGHT CLICK and choose CROP. Hit ENTER.

http://premium1.uploadit.org/LordDream//step3a.jpg
Larger Image

4) Next is resizing the image. Hit [CTRL-ALT-I]. Make sure all the boxes are checked and the sampling function is set to BICUBIC SHARPENER or BICUBIC in PS7 or earlier.

http://premium1.uploadit.org/LordDream//step4a.JPG
Larger Image

5) Change the WIDTH to 2000. all other values remain fixed. i.e. don't change them. if you want the width to be 2500 or 3000 etc then substitute that value. the key is to only re-size 1 time. Hit OK.

http://premium1.uploadit.org/LordDream//step5a.JPG
Larger Image

6) Now SAVE the image. Hit [CTRL-ALT-S]. provide a file name and select JPEG.

http://premium1.uploadit.org/LordDream//step6a.JPG
Larger Image

7) Select the IMAGE QUALITY. In this example I used "8" since the total file size was approximately 1.6 mb. Ideally the file size should be as close to MT's 2mb limit as possible.

http://premium1.uploadit.org/LordDream//step7a.JPG
Larger Image

here is the final result: I'll be your mirror by DREAM
any questions or comments- feel free to respond.

kuroimisa

Retired Moderator

kuroimisa

Wizard of Darkness -under a rock

Great!
I usually scan with the Scanner Wizard >_> And then I open the image in Photoshop- I never knew about the whole bicubic thing, so I guess I'll do that for sure next time- nifty :D

Signature
	Image
Misa|Virtuoso and Legend of W.A.R - UA|Most coordinated Legion of W.A.R
MINITOKYO-WIDE KNOCKOUT WALLING COMP: LAUNCHES MARCH 2010. ONE WINNER. ONE PRIZE.
ADD ME TO YOUR FRIENDS <3

MapleRose

Retired Moderator

MapleRose

likes rainbows :D

what's the difference between the different types of resizing settings? (like bicubic, pixel resize, etc.)

and also, I find that when I scan something glossy, like say magazines, it turns out weird, 'cause there's subtle reflections or something....

and just a note to the PSP users: instead of Save or Save As, use "Export -> JPEG Optimizer", and turn down the compression value until the file size is close to 2mb as possible. Esp if you have lots of reds in the scan, using straight Save or Save As will pixelate the reds horribly >_<

DREAM

DREAM

Lord of Dreams

Quote by kuroimisaGreat! I usually scan with the Scanner Wizard >_> And then I open the image in Photoshop- I never knew about the whole bicubic thing, so I guess I'll do that for sure next time- nifty :D

scanning directly in PS will not only allow the retention of more pixel data but will be easier on your pc's resources as well.

Quote by MapleRosewhat's the difference between the different types of resizing settings? (like bicubic, pixel resize, etc.)

Re-sampling involves changing resolution. You can either add pixels [up-sampling] or reduce pixels [down-sampling] through a process called interpolation. Interpolation adds pixels to the colour value of the surronding pixels. source: Photoshop Creative- see article in OP.

Photoshop CS and above have 5 re-sampling image settings.

Nearest neighbour: Nearest neighbor interpolation is the simplest method and basically makes the pixels bigger.

Bilinear: Bilinear Interpolation determines the value of a new pixel based on a weighted average of the 4 pixels in the nearest 2 x -2 neighborhood of the pixel in the original image.

Bicubic*: Bicubic interpolation is more sophisticated and produces smoother edges than bilinear interpolation.

Bicubic Smoother: Used to up-sample an image. I do not recommend up-sampling scans/images. Mt does not accept scans that have been up-sampled- that is has additional pixels added giving the "appearance" of a larger scan.

Bicubic Sharper*: Used to down-sample an image. Retains detail and sharpens even when removing pixels. [Photoshop Creative]This is the recommended setting for Photoshop CS and above.
source: Dp Review

Quote by MapleRoseand just a note to the PSP users: instead of Save or Save As, use "Export -> JPEG Optimizer", and turn down the compression value until the file size is close to 2mb as possible. Esp if you have lots of reds in the scan, using straight Save or Save As will pixelate the reds horribly >_<

my first imaging program was Paint Shop Pro 9 and it is an excellent program. As noted in my PS step by step, PSP can be used to import scans, crop, resize and save.

the step for saving is, as Lady MapleRose pointed out: different in PSP than PS and actually has an advantage; since you can see the exact file size and the pixels compared [original/new size] next to each other.

to illustrate i pulled up a Hiroki Mafuyu scan that is over 16mb. I will be saving the scan in PSP. this falls under Step 6.

6) Now SAVE the image. go to the main menu and select FILE > EXPORT > JPEG OPTIMIZER. Change the value of the SET COMPRESSION VALUE. In this case i set the value to "11", which gives me a file size of around 1.8mb. Take a second to view the pixels of the final size 1.8mb file compared to the original size of 16mb. Note: for best results make sure the CHROMA SUB-SAMPLING is set to (NONE). Hit OK and choose a file name.

http://premium1.uploadit.org/LordDream//pspsaveA.JPG
Larger Size

wonderful! Thanks for this tutorial.. its really useful...

DREAM

DREAM

Lord of Dreams

updated: guide. sadly the site hosting the step by step screenshots has closed.

page 1 of 1 6 total items

Back to Art | Active Threads | Forum Index

Only members can post replies, please register.

Warning: Undefined array key "cookienotice" in /var/www/minitokyo/www/html2/footer.html on line 73
This site uses cookies. By continuing to browse the site you are agreeing to our use of cookies. Read more.